No products
Product successfully added to your shopping cart
There are 0 items in your cart. There is 1 item in your cart.
Amiga RGB Scart Technical Support Page
What is an RGB cable?
An RGB scart cable is a video cable wired specifically to use the separated colour components output from the Amiga for the best possible picture quality. In its most basic form, it consists of a red, green and blue colour signal plus a sync signal. In order to operate correctly, these need to be at the correct signal level and accompanied by additional switching signals in order to instruct the television to switch to the RGB mode (blanking signal) and function where possible( so it would remove the need to press AV input on the remote for example). Audio is also connected, on the Amiga this is connected via the rear audio output sockets to the scart cable via the short tail lead using the white & red plugs.
Common Issues
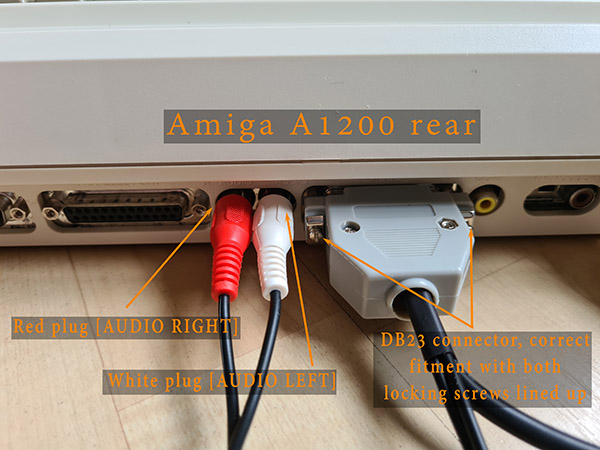
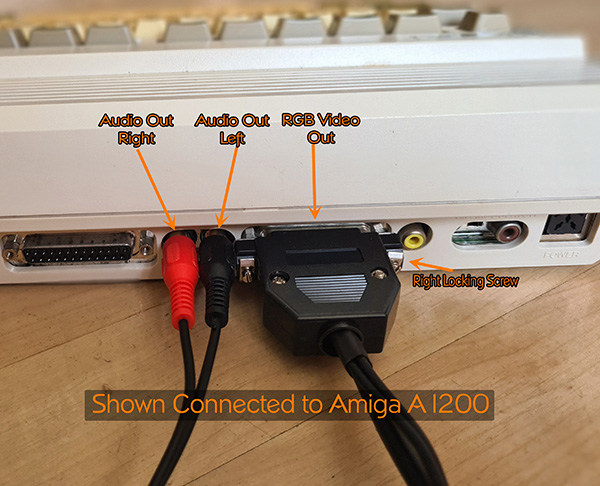
Before proceeding, make sure you have connected up your scart cable correctly. The images below show both of our Amiga RGB scart cables connected to an Amiga A1200. Your Amiga may vary slightly in appearance, but the connections will be the same. On some Amiga models the audio sockets may not be coloured white/red but are still labelled audio left/right.
BEFORE CONNECTING ANY CABLE always turn off power to the Amiga, damage can occur by plugging/unplugging cables whilst powered on. The video plug connects directly into the Amiga's "VIDEO PORT", each of the audio plugs connects into the corresponding audio socket as shown below. The scart plug connects into your TV's RGB scart socket or compatible RGB device (if compatible).

DB23 connector, both locking "original fitment" both locking screws can be used

I have a black screen/there is no display. I'm connected directly into my TV's scart socket.
Are you connecting directly into the TV's RGB scart socket? If the TV has more than one scart socket, it's common for only one of the inputs to be fully wired and able to accept the RGB signal. The main input socket is usually (but not always) either AV1 or EXT1.
I am using a scart to HDMI upscaler - the picture quality is very poor/I have no display at all. It works fine with my DVD player/VCR/set-top box.
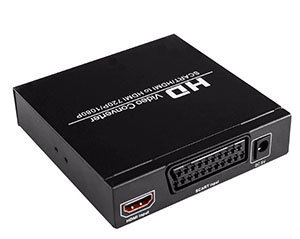
Many scart to HDMI upscalers are not suitable for RGB scart cables. They advertise the fact they convert "scart to HDMI" - but not "RGB to HDMI" which means they are only converting composite video and audio signals (which is fine for VCRs/DVD etc.). The cheapest known working models that are suitable for use with RGB scart cables are devices such as this one available from Amazon UK:

It costs around £35 and is the cheapest "working" alternative to the more expensive dedicated devices such as the OSSC and RetroTink.
I have no audio
The sound on the Amiga comes from the two audio output sockets on the back, marked "LEFT" & "RIGHT". On our Amiga scart cable the short audio tail lead must be connected to the back of the Amiga as shown above. This will then pass audio directly to the scart plug.
What else can I check if I'm having display issues
If you've checked the above points and are still having an issue, this following should be checked:
1. Check plugs are firmly connected, and video sockets are clean from oxidisation/debris
2. Check for bent pins within the scart plug. Sometimes a pin can get out of alignment, particularly if the plug hasn't been inserted straight initially into the socket. If one of the pins is not straight, it may not be making a connection to the socket causing a potential issue. The pin can be straightened by gently bending with a small flat bladed screwdriver. Do not force or over bend as it could cause damage.
3. Is the computer/console in known working order? Is it powered up correctly? A black screen can often be the symptom of an underlying issue, poorly connected games cartrridge, video fault, memory issues etc.


